Supabase를 이용한 apple login 구현하기
이번에는 apple 로그인을 알아볼 텐데요
워낙 보안이 까다롭고 정책도 수시로 바뀌는 터라 아아 폰 앱 개발할 때는 항상 불편한 것 같습니다 😒
OAuth를 이용하지 않고 하는 방법이 보편적으로 사용되는 것 같아서 그렇게 구현해 보겠습니다
로그인을 하기 위한 apple 개발자 설정은 아래 포스팅을 참고하시면 됩니다
[Flutter] Apple 개발자 설정하기
Apple 개발자 설정하기 아이폰에 개발자가 개발한 어플을 업로드하려면 apple 개발자 설정을 해야 하는데 이때 예시로 apple login을 하기 위한 세팅을 어떻게 해야 하는지 알아보는 시간을 가지겠습
nuridal-class.tistory.com
Flutter 코드 구현
supabase_apple_login.dart
apple 개발자 설정을 잘 따라와 주셨으면 아래와 같이 코드를 구현하면 되는데
보면 기존에 Flutter에서 Apple 로그인하는 부분과 많이 다를 것은 없고
추가된 부분만 있는 것을 확인할 수 있습니다
//📲 전체코드는 github에서 확인하실 수 있습니다
...
              loginButton(
                  text: 'APPLE 로그인',
                  textColor: Colors.white,
                  buttonColor: Colors.black,
                  context: context,
                  svgPath: 'assets/apple_logo.svg',
                  width: 30,
                  height: 30,
                  onPressed: () async {
                    try {

                      //📲 apple 로그인이 정상적으로 되면 snackbar를 띄우는 부분
                      AuthResponse response = await signInWithApple();
                      if (response.user != null) {

                      //📲 apple user info의 email을 가져오는 부분
                        final snackBarText = SnackBar(
                            content: Text('${response.user?.email}님 반갑습니다'));
                        ScaffoldMessenger.of(context)
                            .showSnackBar(snackBarText);
                      }
                    } catch (e) {
                      debugPrint('$e');
                    }
                  }),
              ElevatedButton(
                onPressed: () {
                  Navigator.pop(context);
                },
                child: const Text('back'),
              ),
            ])));
  }

  //📲 apple login 함수
  Future<AuthResponse> signInWithApple() async {

    //📲 supabase가 들어가는 부분
    final rawNonce = supabase.auth.generateRawNonce();
    final hashedNonce = sha256.convert(utf8.encode(rawNonce)).toString();

    final credential = await SignInWithApple.getAppleIDCredential(
      scopes: [
        AppleIDAuthorizationScopes.email,
        AppleIDAuthorizationScopes.fullName,
      ],
      nonce: hashedNonce,
    );

    final idToken = credential.identityToken;
    if (idToken == null) {
      throw const AuthException(
          'Could not find ID Token from generated credential.');
    }

    //📲 user 정보와 token을 return 하는 부분
    return supabase.auth.signInWithIdToken(
      provider: OAuthProvider.apple,
      idToken: idToken,
      nonce: rawNonce,
    );
  }
}
실행화면
최초 계정 등록은 한 뒤에 로그인 화면이라 조금 다를 수도 있습니다
log 확인
디버깅 로그를 확인해 보면 아래와 같이 데이터의 정보들을 확인할 수 있습니다
flutter: **** onAuthStateChange: AuthChangeEvent.signedIn flutter:
{"access_token":"eyJhbGciOiJI.... Yn5 dvNztfXWECxs", "expires_in":3600, "expires_at":1705468491, "refresh_token":"djFXKnUB8 SpirhORtDaJzQ", "token_type":"bearer", "provider_token":null, "provider_refresh_token":null, "user":{"id":"76d23a52-7a25...", "app_metadata":{"provider":"apple", "providers":["apple"]},
"user_metadata":{"custom_claims":"auth_time":1705464889}, "email":"wjddmstjr65@gmail.com", "email_verified":true, "iss":"https://appleid.apple.com", "phone_verified":false, "provider_id":"000314.e3336....", "sub":"000314.e333613...."}, "aud":"authenticated", "confirmation_sent_at":null, "recovery_sent_at":null, "email_change_sent_at":null, "new_email":null, "invited_at":null, "action_link":null, "email":"wjddmstjr65@gmail.com", "phone":"", "created_at":"2024-01-17T 04:14:51.716131 Z", "confirmed_at":null, "email_confirmed_at":"2024-01-17T 04:14:51.72115395 Z", "phone_confirmed_at":null, "last_sign_in_at":"2024-01-17T 04:14:51.721684418 Z", "role":"authenticated",
"updated_at":"2024-01-17T 04:14:51.723292 Z", "identities":[], "factors":null}}
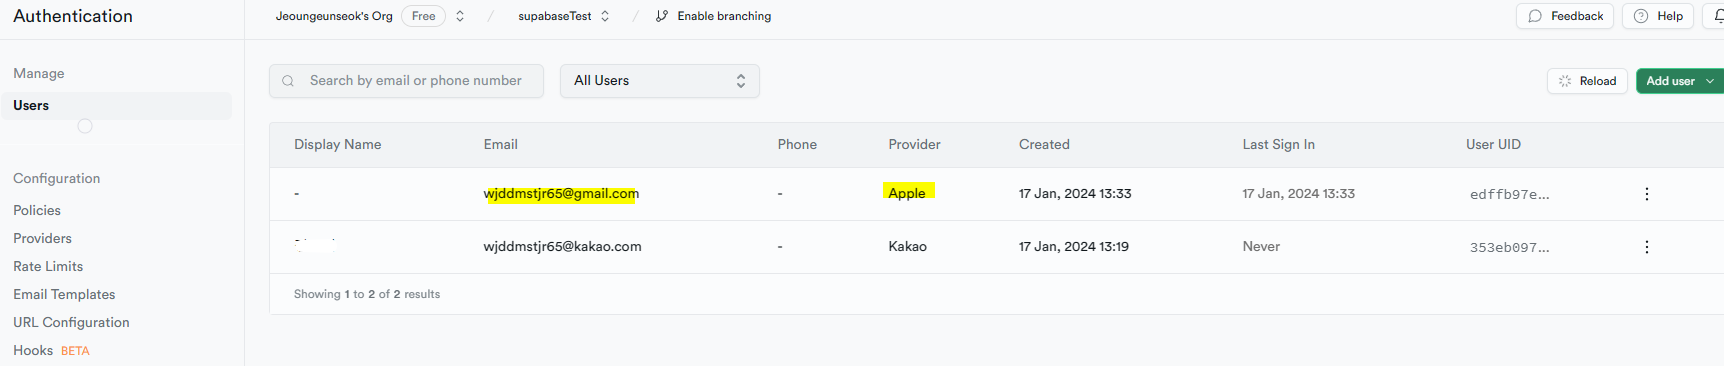
Supabase 페이지 확인
Supabase 페이지에서 Users를 들어가보면 supabase를 이용한 user들의 정보들을 확인할 수도 있습니다
(전에 카카오 로그인 테스트했던 사항도 보이네요!)
💡 로그인 코드는 개인 github에 있습니다
마음껏 사용하셔도 됩니다!!
GitHub - Jeoungeunseok/supabase: supabase connection and postgreSQL use
supabase connection and postgreSQL use. Contribute to Jeoungeunseok/supabase development by creating an account on GitHub.
github.com
이번 포스팅으로 supabase를 이용한 apple login에 대해서 알아보았습니다
여기에서는 카카오 로그인처럼 OAuth를 사용하지 않았지만
다음 포스팅에서는 OAuth를 사용하는 방법에 대해서도 알아보겠습니다
그럼 코딩이 쉬워지는 그날까지!!

'CODE > Flutter' 카테고리의 다른 글
| [Flutter] Supabase docker 환경에서 google 로그인하기 (1) | 2024.01.29 |
|---|---|
| [Flutter] Supabase docker 환경에서 kakako login 하기 (0) | 2024.01.24 |
| [Flutter] Apple 개발자 설정하기 (0) | 2024.01.17 |
| [Flutter] app package name 변경하기 (0) | 2024.01.16 |
| [Flutter, iOS error] An attribute in the provided entity has invalid value An App ID with Identifier '.....' is not available. Please enter a different string. (0) | 2024.01.16 |


